MAKING DAMASCUS STEEL
Damascus steel will bring life to any blade and each piece is unique; even pieces of the
same pattern will have subtle differences. For the ultimate in beauty and individuality,
this is the steel of choice for your knife. Damascus is a generic term given to what is
really pattern welded steel. The name "Damascus steel" was popularized by the
Crusaders returning with stories of the amazing edged weapons with the mysterious
patterns in the steel.
Several different cultures had similar parallel developments; but probably the most recognizable would be ancient
Japanese swords and knives. The steel was forged from iron sand with carbon added and folded repeatedly to
purify the steel. The level of carbon was varied in two separate billets, one hard and one soft. The soft billet formed
the core of the blade, wrapped in the hard shell and the result was a blade with a flexible spine and a very hard
edge. There could be about 10,000 layers in the soft billet and about 30,000 layers in the hard billet.
Damascus steel today is used primarily for it's beauty, although it does make an excellent and long wearing blade, if
constructed from proper steels of good quality and heat treated correctly. I personally carry only damascus knives
and use one for processing deer during hunting season. Beautiful to look at and a joy to use. My damascus high
carbon steel is not especially prone to rust and only minimal care will keep it looking great. In my opinion, this is due
to proper heat treating and multiple thermal cycles to refine the grain structure.
Following are a few photos and some short videos of damascus steel being made in my shop. Enjoy! Click on the
photos for a full sized view.
photos for a full sized view.
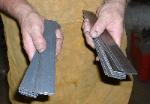
Raw steel about to be made into a damascus billet. On the left is high carbon steel,
either 1084, 1095 or 52100. In this case it's 1084 - .84% carbon, a good carbon
content for a blade. On the right is either L6 or 15N20. In this case it's 15N20, which
is basically 1084 with some nickel content, for contrast. The mill scale needs to be
ground off before it's ready for forging into a billet.
Here's a 16 layer billet, ready to be forged. The steel has been ground clean,
stacked in alternating layers of high carbon and high nickel steels and a handle
welded on.
stacked in alternating layers of high carbon and high nickel steels and a handle
welded on.
Here I am at the forge, fluxing a billet. Fluxing helps clean the impurities from
between the layers. For forge welding, you want a neutral or reducing fire in your
forge. Oxygen is our enemy at this point as it contributes to scale formation on the
billet and between layers, preventing us from getting a good weld. The flame jumping
out the front door of the forge several inches indicates an oxygen lean or free
atmosphere in the forge - it's looking for oxygen to burn outside the forge.
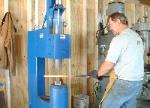
Air hammer in action. This billet is pretty drawn out - time to cut it in half and fold it.
But first, it needs to be straightened out a bit, by hand, to keep the billet neat and
straight after it's folded.
straight after it's folded.
BAM!! I'll straighten it out in both directions.
Time to grind off the scale, cut nearly in half, fold, flux and return to the forge all
before it looses all it's heat. We'll repeat this process until we have the layer count we
want, for the particular pattern we're after.
before it looses all it's heat. We'll repeat this process until we have the layer count we
want, for the particular pattern we're after.
SOME VIDEOS
| FLUXING A BILLET AT THE FORGE |
| FORGE WELDING A LARGE BILLET BY HAND ON THE ANVIL |
| FORGING OUT A LARGE BILLET UNDER THE POWER HAMMER |


